Creating Paper in Express Mode for Entrance Exam
Follow these simple steps to generate a paper for an entrance exam like JEE Mains: Examin8 is an advanced test generator to create papers for JEE, NEET, JNV, and more.
-ae4dfb0a165a8f017037c3d1674e5303.png)
Step 1: Create a New Paper
- Navigate to Exams: Go to the “Exams” section.
-0573a1268d728d37a82ceb54d1422b4d.png)
- Select ‘Create Paper’: Click on the 'Create Paper' button. New users must add institute details there to proceed.
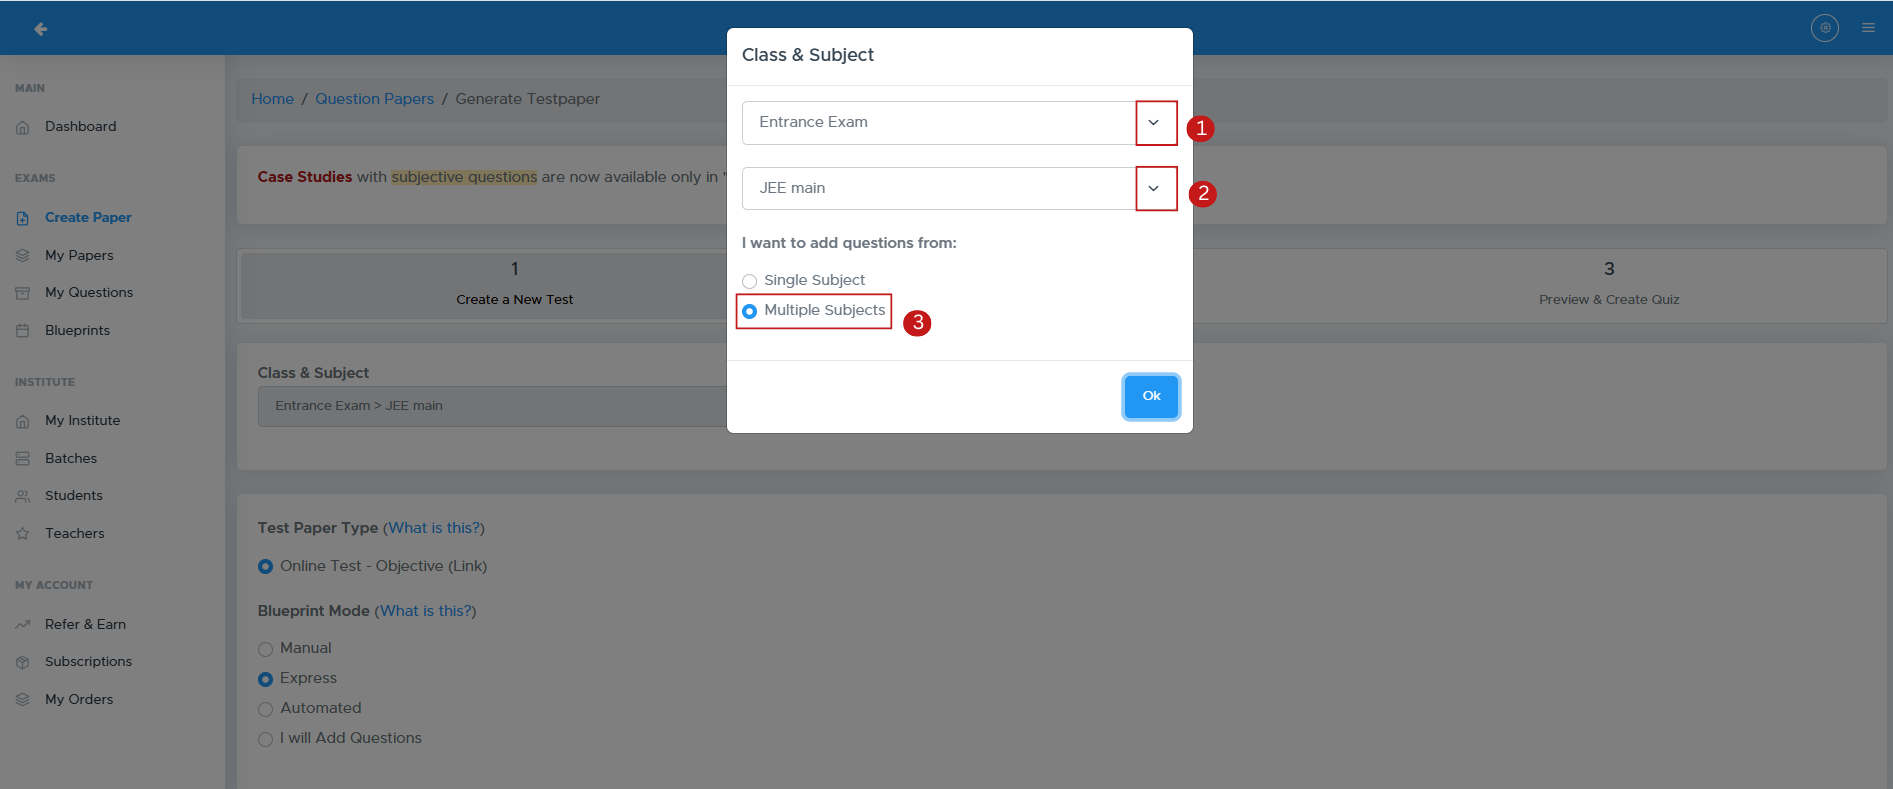
Step 2: Select Class and Subject
- Choose Class and Subject: Click on the “Select” button to pick the class and subject for your test paper.
-c9eafc3631099b5cf28ddb3c6b2ea211.png)
Step 3: Specify Course and Subject
- Module Selection: Navigate to the module selection dropdown and choose Entrance Exam.
- Select Course: From the course options, select JEE Main to specify the target exam.
- Select Single Subject or Multiple Subjects:
- Choose Single Subject to generate a paper for one subject (e.g., Physics).
- Choose Multiple Subjects to include multiple subjects in your test paper.
Step 4: Configure Test Paper Details
- Test Paper Type: Decide the format (Question Paper, Worksheet, etc.).
- Blueprint Mode: Select how to structure your test.
- PDF Header and Footer: Select your logo and header/footer text.
- Test Paper Name: Enter the name for the test paper.
- Time Allowed: Specify the duration for the test.
-fdea67d41804411805daa4113b1a5a81.png)
Step 5: Customize Test Paper Settings
- Enable Negative Marking: Tick the Enable Negative Marking checkbox to apply penalties for wrong answers.
- Specify Negative Marking Percentage: Enter the percentage to subtract from the original marks for each incorrect answer. E.g. for 1 mark question, 25% with deduct .25 marks for incorrect answer.
- Shuffle Questions & Options: Tick "Shuffle Questions & Options" to randomize the order of questions and answer options.
- Specify additional settings:
- Show marks alongside each question.
- Add general instructions.
- Accept the Terms of Use checkbox and proceed by clicking Next.
-63ecb6571858dd44e4521727777780ca.png)
Step 6: Add Questions
- Select Chapters and Questions: Choose chapters and the types of questions to include by clicking subject-wise tabs.
-1bdc347a578377c3a42406ac68a7c245.png)
- Sorting Options: Decide how questions will be sorted (Question Type or Marks.)
-47e607894bf6a3ad28e751ab2bfed5ab.png)
Click on “Save & Continue to Step-3” to proceed.
Step 7: Final Review
Click on Refresh to proceed.
- Use the Actions button to replace or reorder questions.
- If you want to include internal choices within a section, Tick the checkbox labeled "Add Internal Choice Within Sections"
- Click on “Continue” to proceed.
-eda5eb88d4560057a503aa8c93baa1c5.png)
Step 8: Quiz Scheduling Settings
A pop-up window allows the user to configure quiz scheduling settings.
- Quiz Start Datetime: Field to specify the starting date and time of the quiz.
- Quiz End Datetime: Field to specify the ending date and time of the quiz.
- Result At: A dropdown menu to select when the quiz results should be displayed.
-57aa8c96ee87cf0d39c10e7c5aa5879d.png)
Click on “Create Quiz”.
Step 9: Download Your Test Paper
- Access Your Paper: After generation, you’ll be directed to the 'My Paper' page.
- Download Format: Click the Actions button to download as .doc (Word) or 2 column pdf.
- You can modify the quiz start date, end date, result date, and time allowed by clicking the Edit option beside each respective field.
-878a1fce0e81575cba7213b12d36b14a.png)
FAQs
1. What formats are supported for the logo?
Supported formats include .jpg and .png.
2. Can I edit the test paper after generating it?
Yes, you can make changes and regenerate the paper.
3. How do I contact customer support?
You can reach support via the app or email at [email protected]
4. Is there a limit to the number of questions I can add?
No, you can add as many questions as needed based on the selected format.
5. Can I create papers for competitive exams?
Yes, Examin8 supports papers for various competitive exams.
Contact Support
For assistance, please reach out to our support team:
- Email: [email protected]
- Phone: +91-9213522769, +91-8448425258