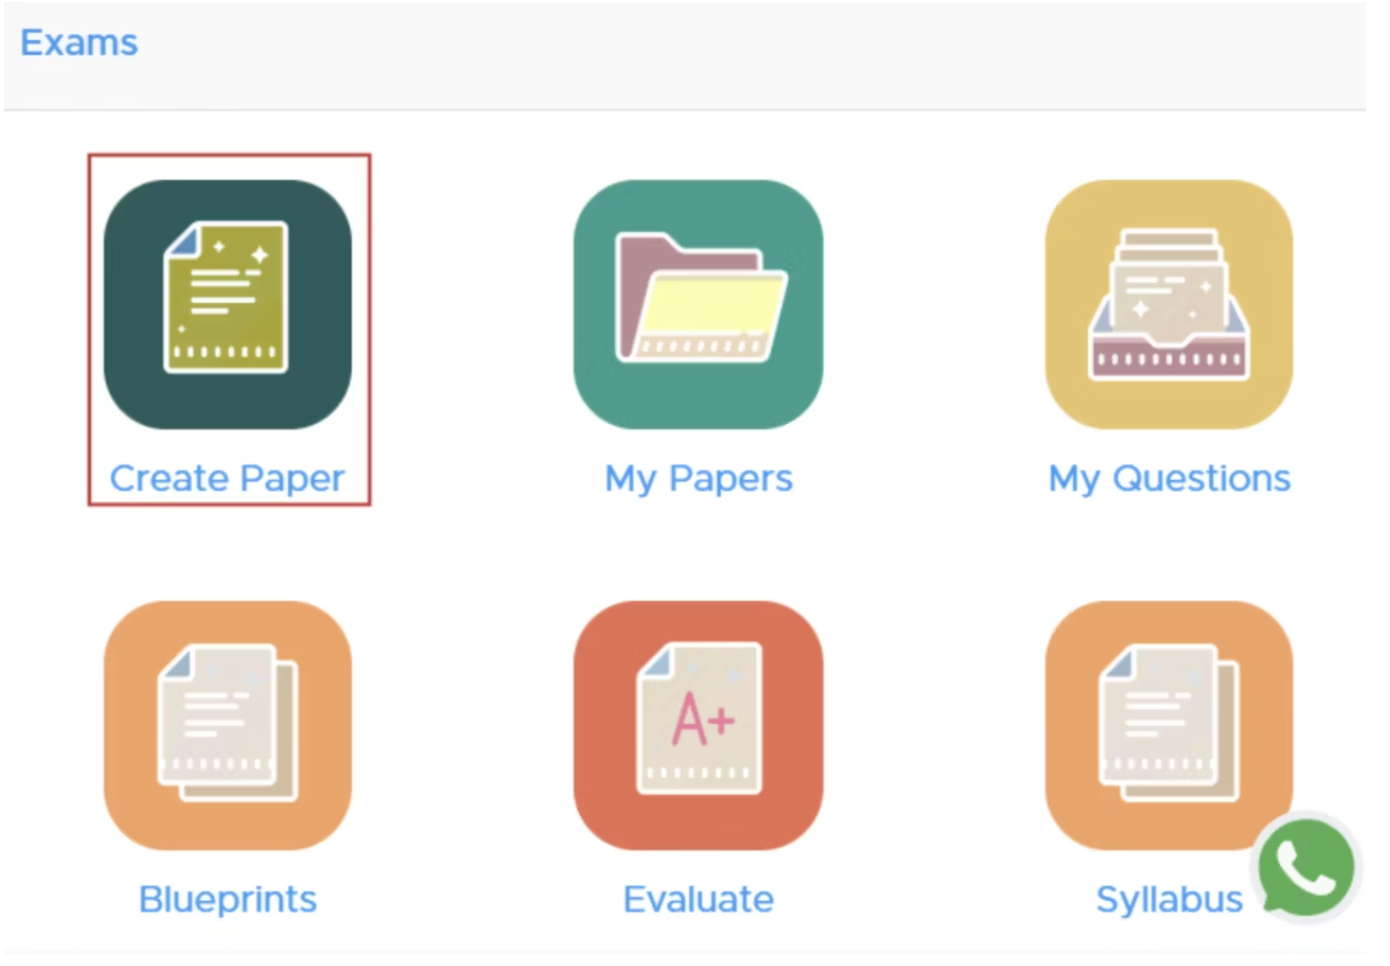
Step 1: Create a New Paper
- Navigate to Exams: Go to the “Exams” section.
-
Select ‘Create Paper’: Click on the ‘Create Paper’ button. New users must add the institute details there to proceed.
Step 2: Select Class and Subject
Choose Class and Subject: Click on the**“Select” **button to pick the class and subject for your test paper.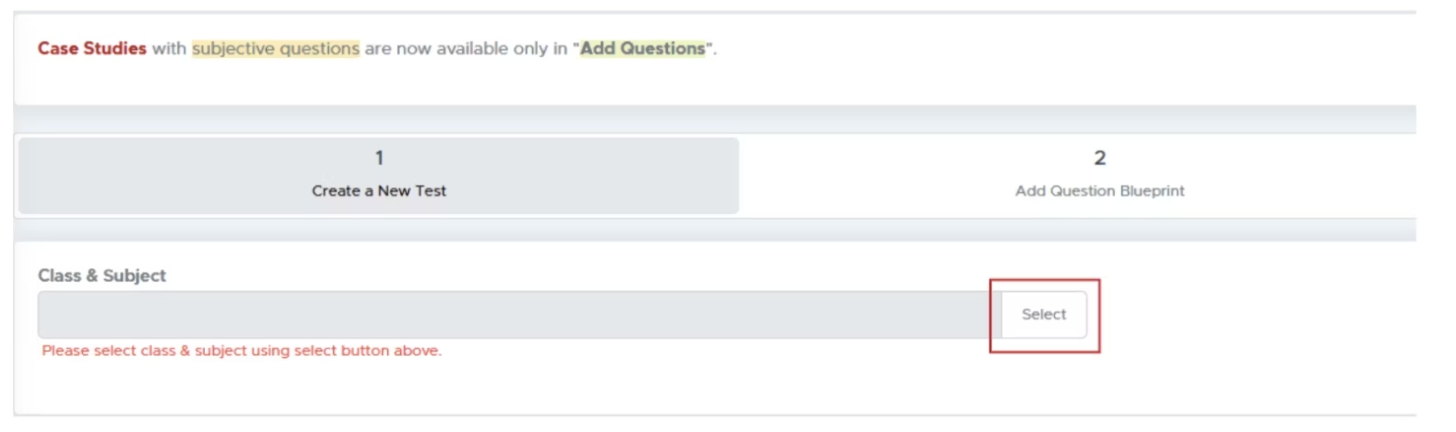
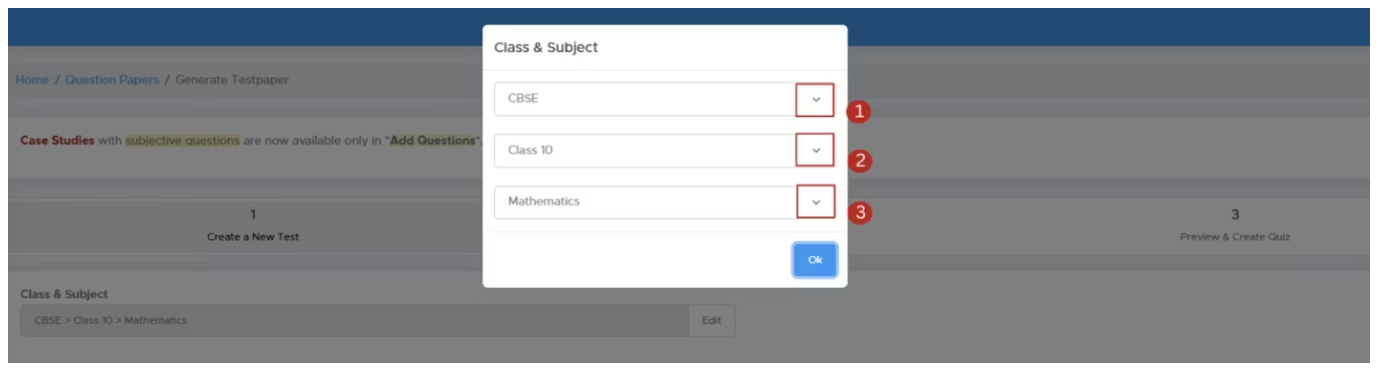
Step 3: Specify Course and Subject
- Module Selection: Choose from available modules (e.g., CBSE, ICSE).
- Select Course: Choose the relevant course for the test.
-
Competitive Exams: If applicable, select the specific exam type and whether to create a single or multiple-subject paper.
Step 4: Configure Test Paper Settings
- Source Selection: Choose your question source as All Questions (only for premium users). If you are not getting this option, you need to Buy Subscription to access this feature.
-
Test Paper Type: Here, you have two choices: Objective and Subjective. We recommend choosing the Online Test - Objective as it is auto-evaluated and a commonly used format.
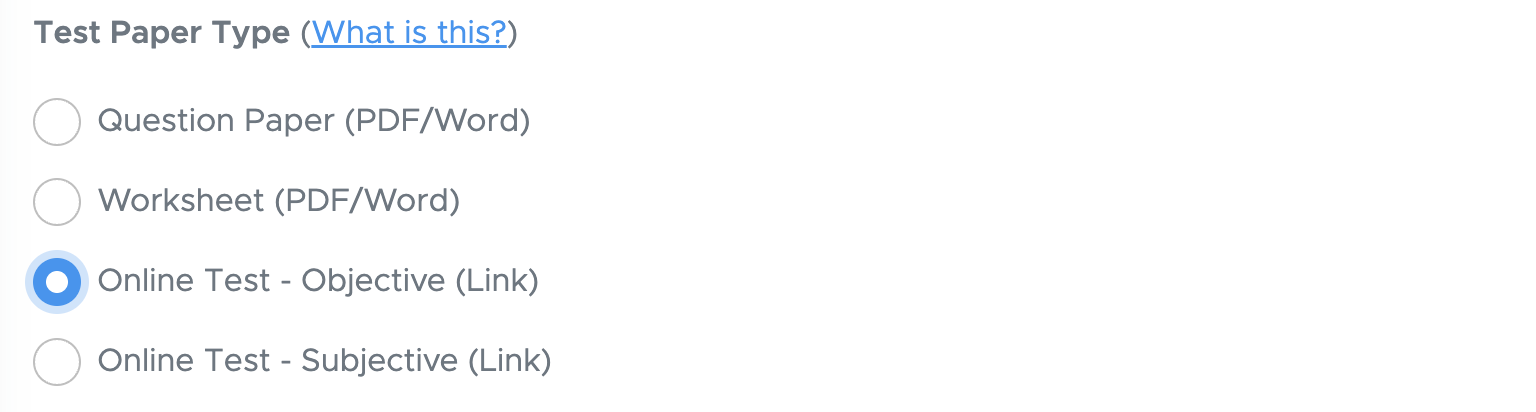
- Online Test - Objective (Link): This is an online test with only objective questions, such as MCQ, ARQ, T/F, Fill-ups and One-word answers. The result will be automatically generated.
- Online Test - Subjective (Link): This is an online test including both subjective and objective questions. Here, the objective part will be evaluated automatically and the teacher will evaluate the subjective part. Students will upload question-wise images of the solutions.
-
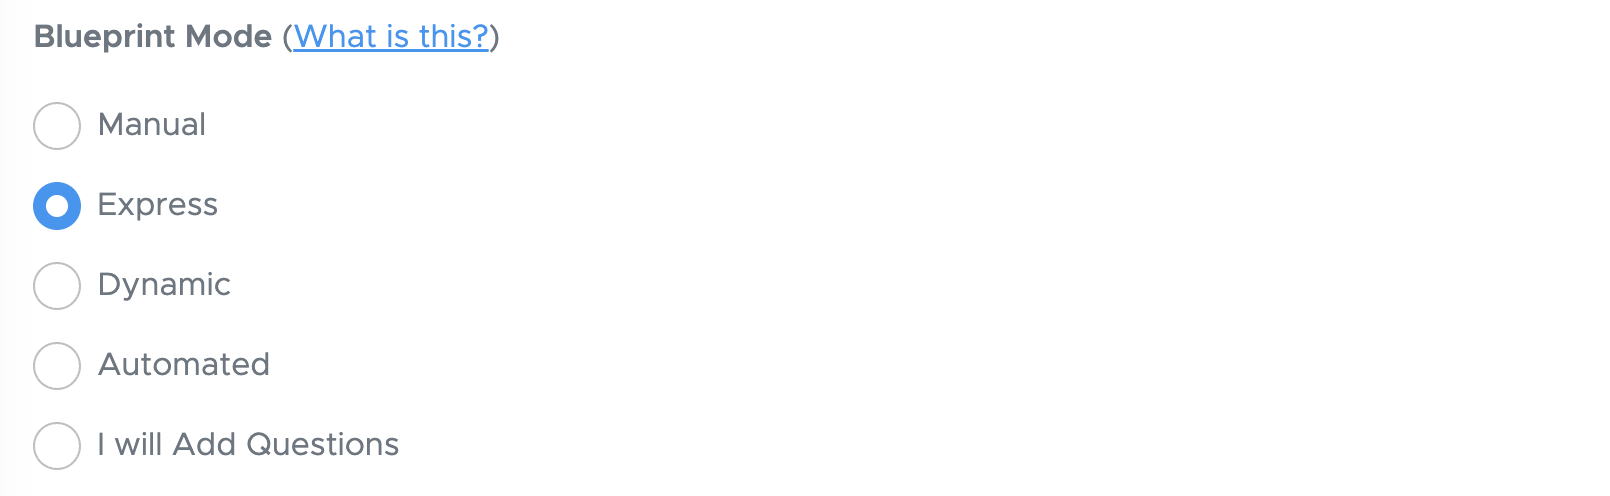
Blueprint Mode: Choose the blueprint as per your requirement. Usually, teachers use Express mode or Automated mode here. In the blueprint mode section, you have Manual, Express, Dynamic, Automated, Previous Year Paper and I will add Question options.
Manual: You can add questions one by one from each chapter. Suitable if too much customization is required.
Express: You can add questions altogether from each chapter. Suitable if less customization is required.
Dynamic: Select the chapters, and the paper will be generated automatically using a prefilled blueprint. The same blueprint can be reused with different chapters, but chapter-wise weightage is almost evenly distributed.
Automated: The question paper will be generated automatically based on a predefined blueprint, including specified chapters and chapter-wise weightage. However, you can use the “Customize this Blueprint” option to make modifications as needed.
I Will Add Questions: You will add your own questions or select questions from your own question bank.
Step 5: Customize Paper Details
- Select Header and Footer: You can select the PDF header that you have already added there. You can also modify your logo and header/footer text by clicking the edit header link.
- Test Paper Name: Enter a name for your question paper, such as “Half Yearly Exam,” “Periodic Test - 1,” or “Annual Examination.”
- Time Allowed: Enter the duration for the online test.
- Shuffle Questions & Options: This feature randomizes the order of questions and answer options within a section for each student during an online test. All students receive the same questions and options, but arranged differently, which helps minimize the chances of cheating. Please note that the order of questions and options shown on the result page is the same for all students. As a result, students may see a different sequence on the result page than what they encountered during the test. However, the evaluation remains accurate, and responses are marked exactly as selected by the student
- General Instructions: Some default instructions are provided in Dynamic Mode. You can edit or delete them as needed.
- Accept the Terms of Use checkbox and proceed by clicking Next.
Step 6: Question Selection
Based on the blueprint mode you selected, you will get the options on this page. Here are the examples: Manual: You will get the option to add questions to the blueprint one by one. Express: We will show you the chapter list to choose the number of questions. Dynamic: Just select the chapters. Automated: This intermediate screen will not appear and you will get questions directly. I Will Add Questions: You will have to add your own questions.Step 7: Final Review and Generation
Click on Refresh to proceed. You will get a question paper with questions selected from our database. You can review them and then proceed to generate the paper. All the changes made in Step 3 are saved automatically. If you leave the paper at this step and later return by clicking RESUME under MY PAPERS, all your previous changes will be restored automatically.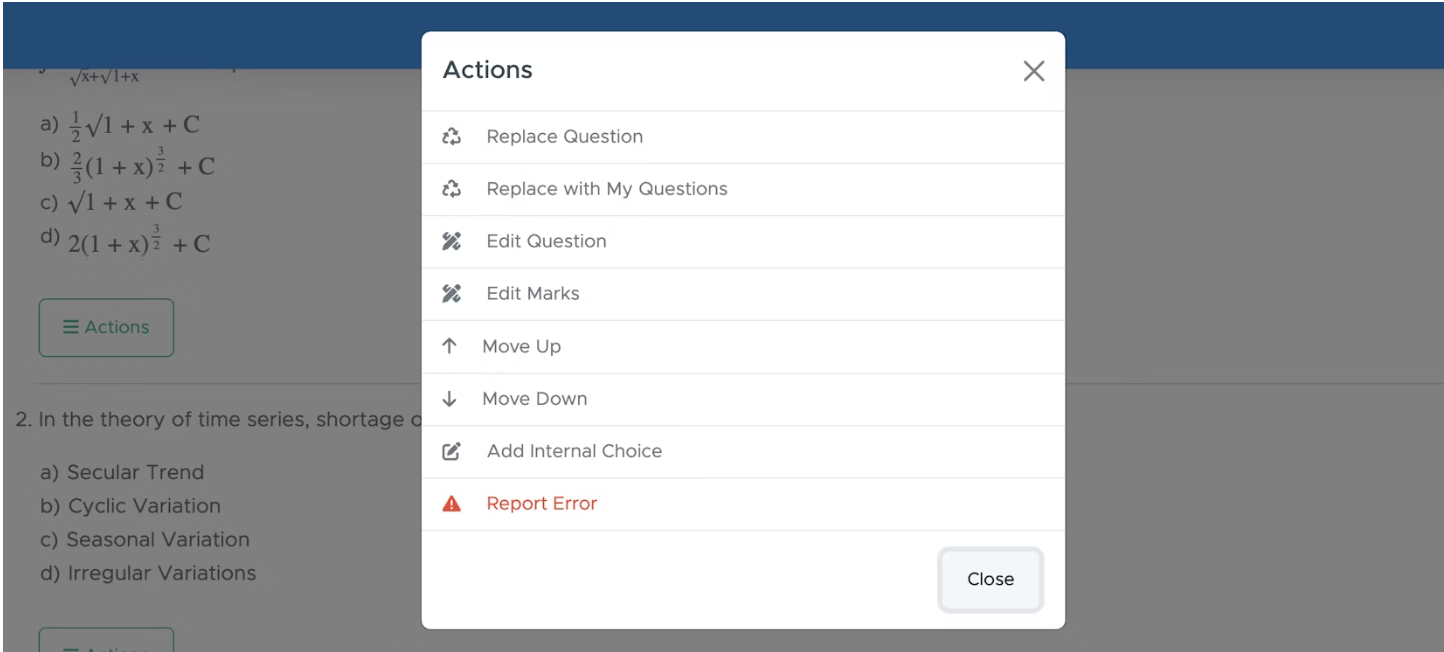
- Edit Section Name: If needed, click the edit icon next to the section name to change or update the section title.
- Move Whole Section Up or Down: Although it is rarely required in Dynamic mode yet you can use this option by clicking the down or up arrow placed beside the section name.
- Replace Question: If you find a question that isn’t relevant, click the Action button below it and select Replace Question. You’ll see up to 30 alternative questions across 3 pages. Choose the one you prefer to replace the current question.
- Replace with My Question: If you’ve already added your own questions in the test generator, click Replace with My Questions to choose a question from your personal list for replacement.
- Move Question Up or Down: If you would like to move a question up or down, click or ACTIONS, then click move up or move down to change the placement of the question.
- Edit Question: If you want to add your own question instead of the one provided, click ACTIONS and then select Edit Question. You can delete the existing question text and enter your own, or simply modify it as needed. You can also edit the options and solution from the same window.
- Edit Marks: If required, you can click on ACTIONS, then click Edit Marks to change the marks.
- Edit Testpaper Details: On this screen, you can also change the question paper name, time allowed and general instructions.
-
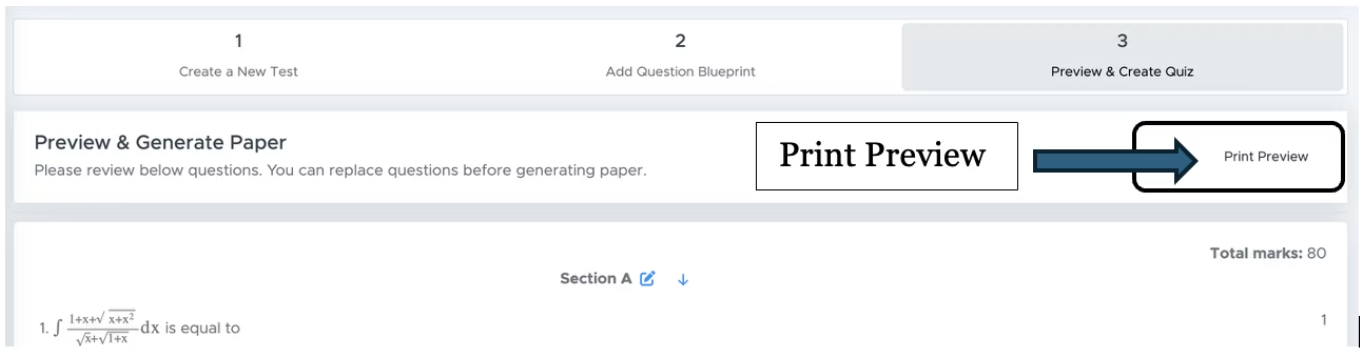
Print Preview: Once the paper is generated, you won’t be able to edit any questions in the PDF file. That’s why Step 3 includes a very useful feature — Print Preview.
Advance Test Options:

-
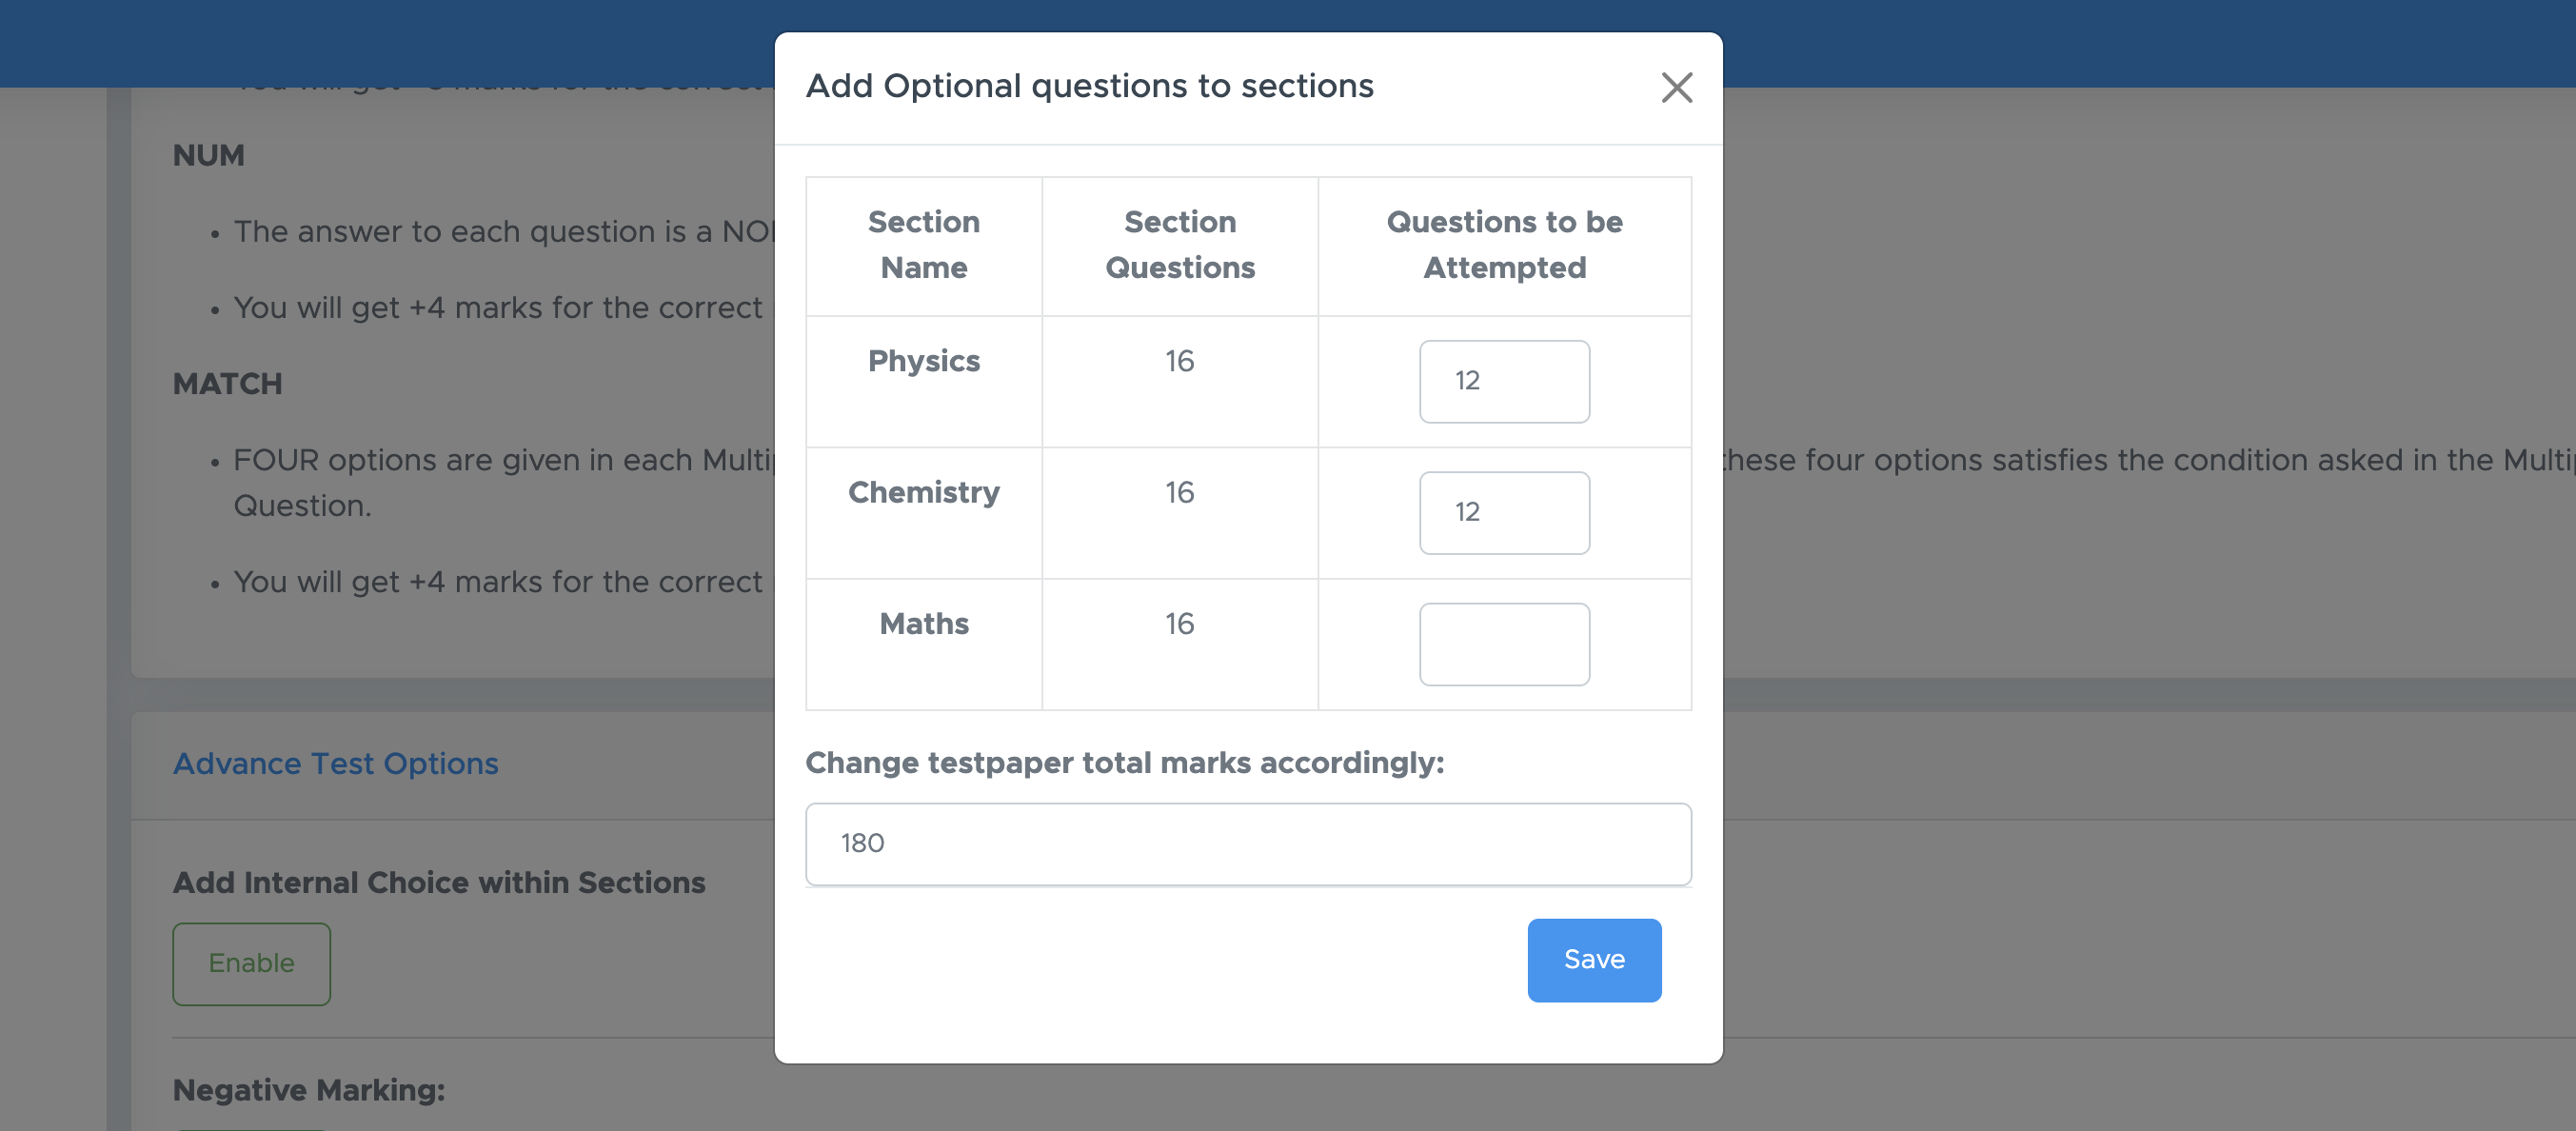
Add internal Choice within Section: If you want to give an internal choice within sections, like attempt any 5 questions out of the given 10 questions from a particular section, you should click on the enable button there and update the number of questions to be attempted. Leave blank if you want the student to attempt all questions from any section. You must change the overall marks accordingly.
-
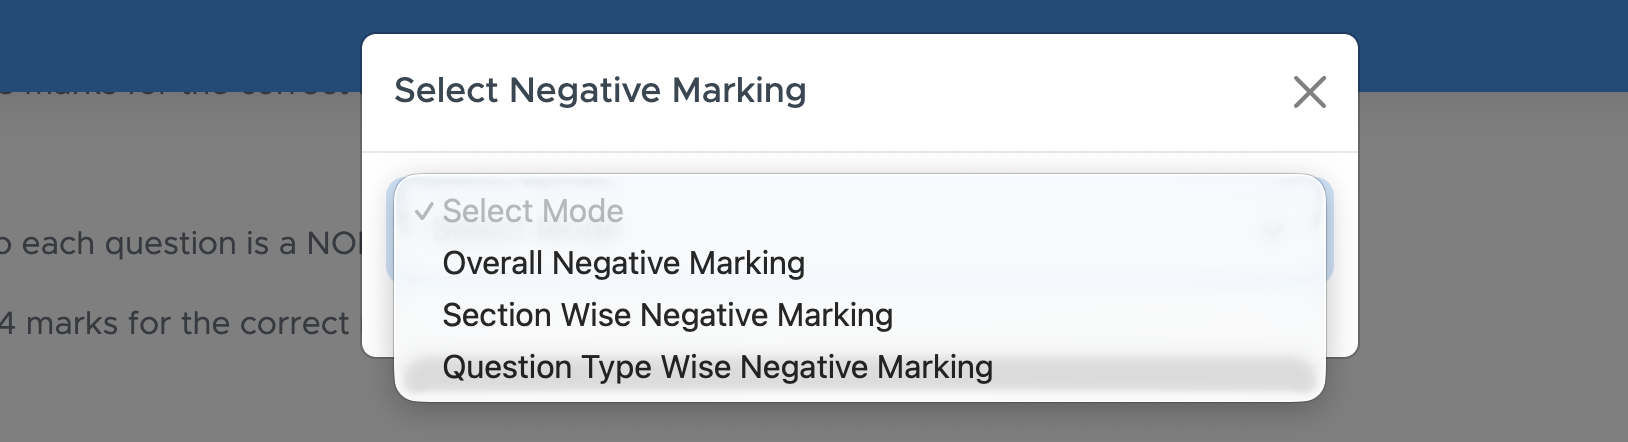
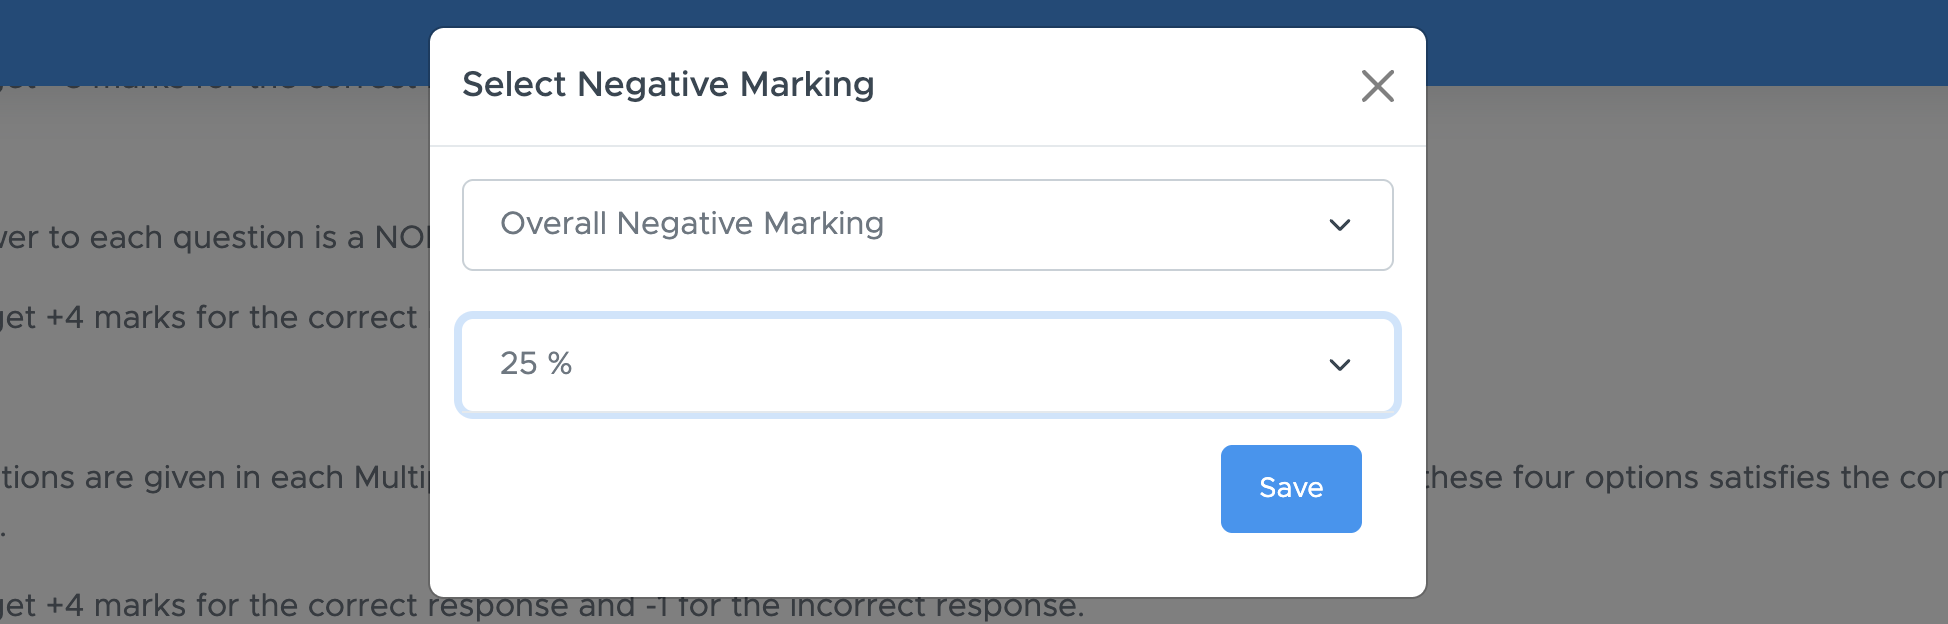
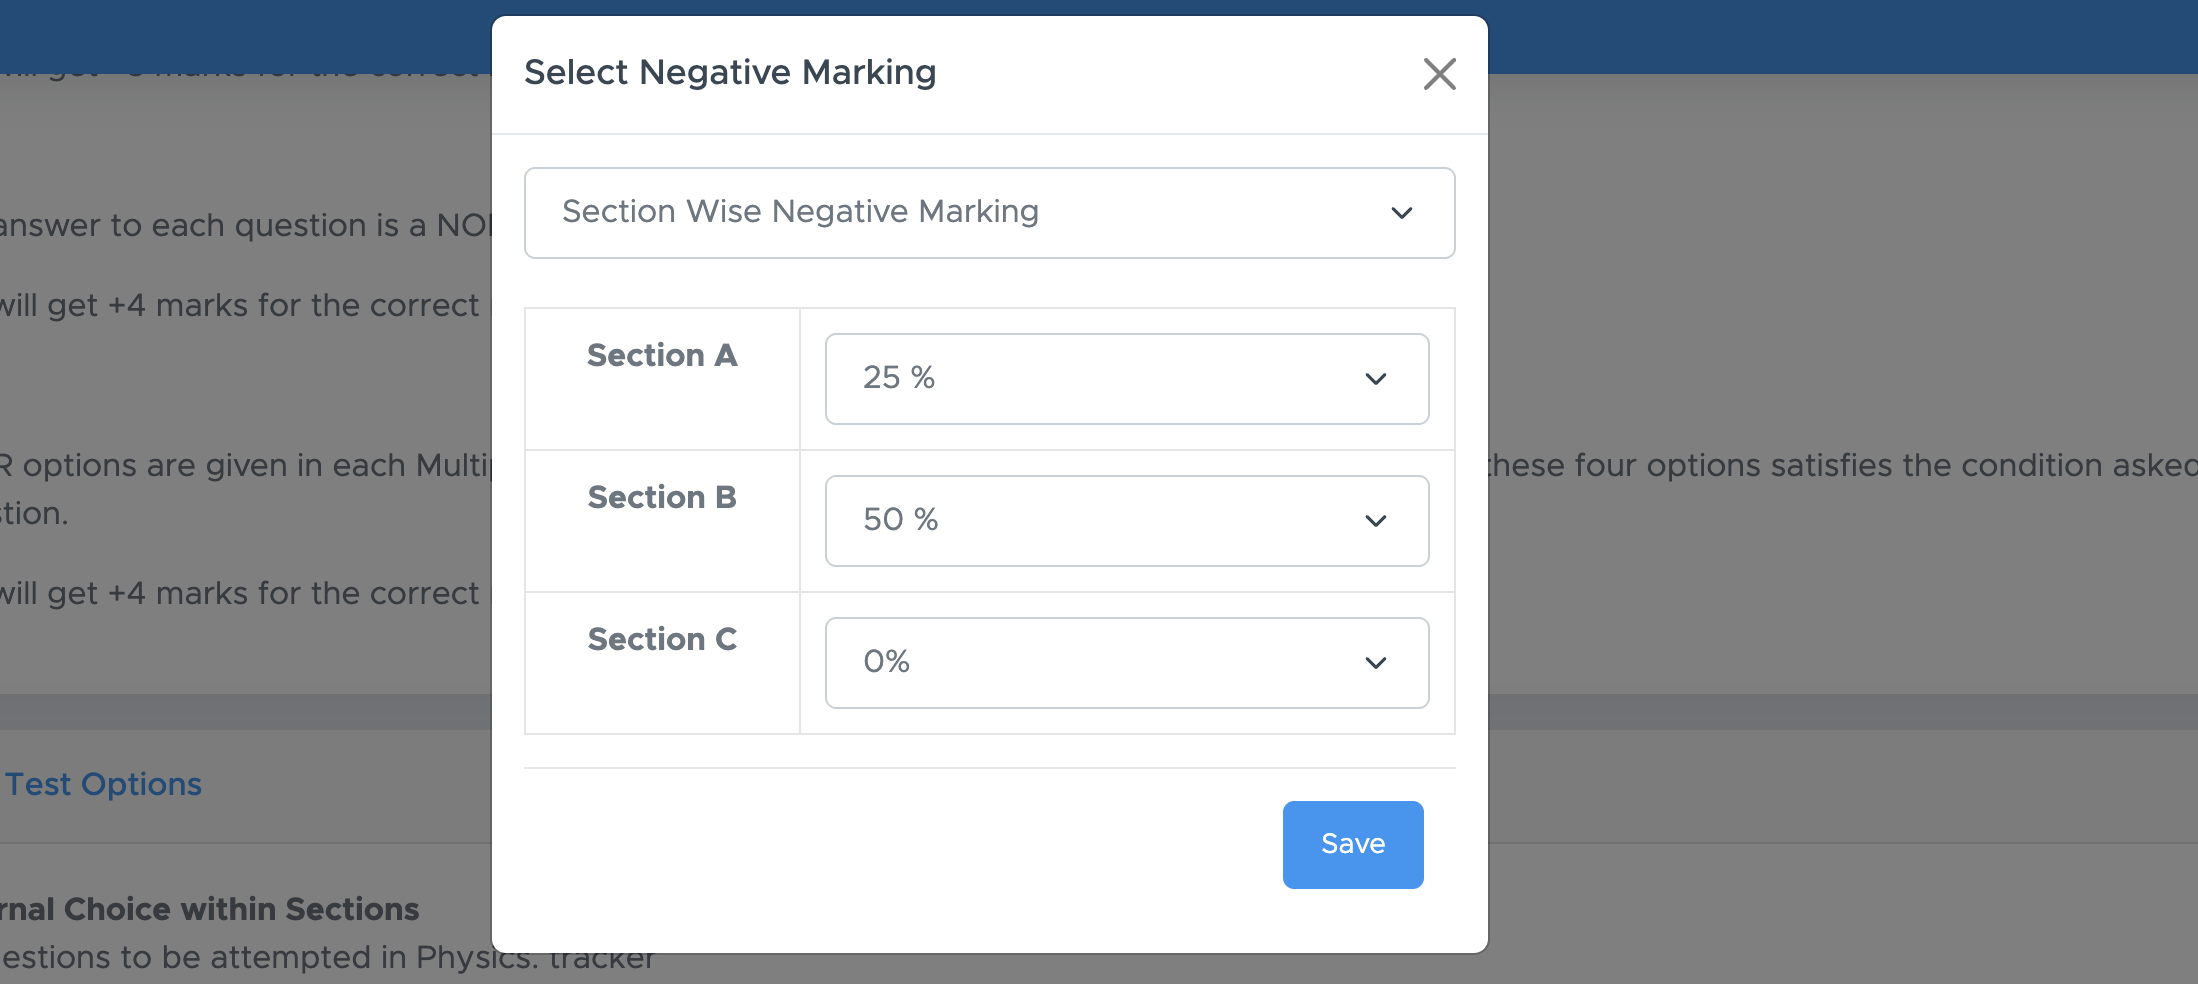
Negative Marking: To enable negative marking, use this option. You will get different formats as below:

- Continue: Click ‘Continue’ to finalise your online test.
Step 8: Online Test and Result Date - Time
- Quiz Start Date-Time: This is the date and time when the online test will start. You can click on the right square icon to select the date and time.
- Quiz End Date-Time: This is the date and time when the online test will end for all. It is not necessary to end the quiz exactly after the duration is over.
- Important Note: Here are some very important points to note:
(a) The gap between start-time and end-time can not be less than the quiz duration. For example, if the quiz duration is 60 minutes, there must be a gap of 60 minutes between the quiz start and end time. To keep the test live for a longer time, you can keep a gap of 2-3 days or even more, but not longer than your package expiry date.
(b) Start-time can not be less than the current time. It means, if the current time is November 10, 2016, 10:45 PM, your start time can not be earlier than that. But you can put any future time up to your package expiry date.
(c) You can edit the date and time of the test under MY PAPERS till the test actually starts. But once the test is started, you will get the option to change the date and time. - Result Date and Time: There are four options. Choose any one of them as per your requirement.
(a) When the quiz ends for all: It means your students will get the result at the quiz end date and time.
(b) Let me decide a date: You can pick a date to declare the result. It can be any date after the quiz end date & time.
(c) I will decide later: You can leave it for now and decide on a result date later. Also, if you don’t want to show results to your students, you can choose this option.
(d) When the student submits the test: If you want your student to see the results immediately after submitting the test, you should use this option. The main drawback of this option is that if you are sharing the same test with multiple student who knows each other, they can share the answer key. - After that, click on Create Quiz to proceed.
Step 9: Share Online Test
There are two ways to share the online test with your students:(a) Share using Normal Browser
(b) Share using Safe Exam Browser
| Features | Normal Browser | Safe Exam Browser |
|---|---|---|
| Multiple Tabs | Students can open a new tab to find answers on the internet. | Students can’t open a new tab until the test is in progress. |
| Re-attempt | Students can close the browser and resume or re-attempt the test. | Students can’t re-attempt the test once the browser is closed. |
| Screenshots | Students can take screenshots. | Students can’t take screenshots. |
| Screen Recording | Students can record the screen. | Students can’t record the screen. |
| Keyboard Shortcuts | Students can use keyboard shortcuts to open any other application, like a calculator. | Students can’t use any keyboard shortcut to open any other application. |
| Copy, Paste and Print | Students can easily copy, paste or print the paper. | Students can’t copy, paste or print the paper. |
(a) Share on Normal Browser
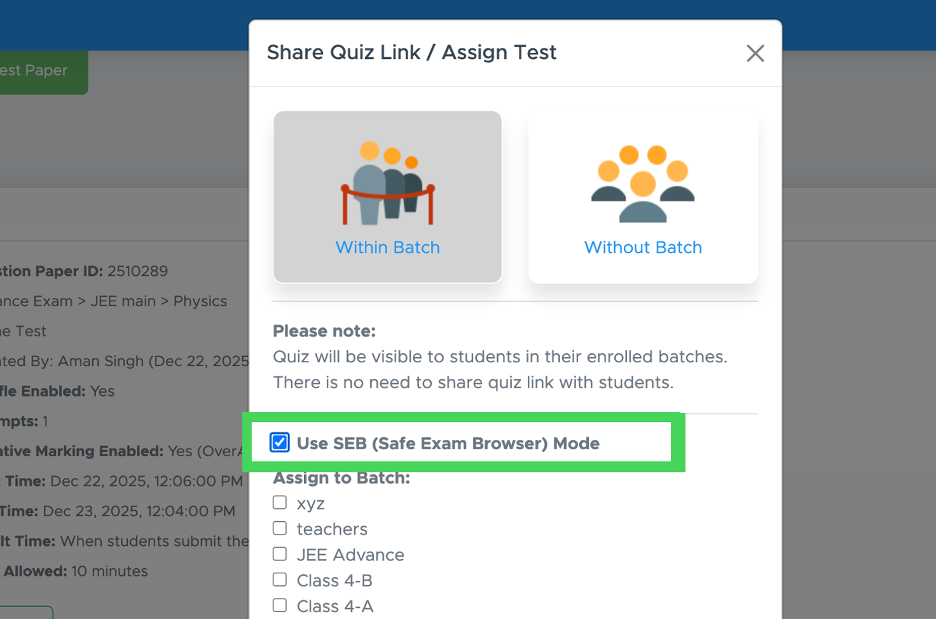
Once the test is created, go to ‘My Papers’ and click on ‘Actions’ below the paper name, then click on ‘Share’.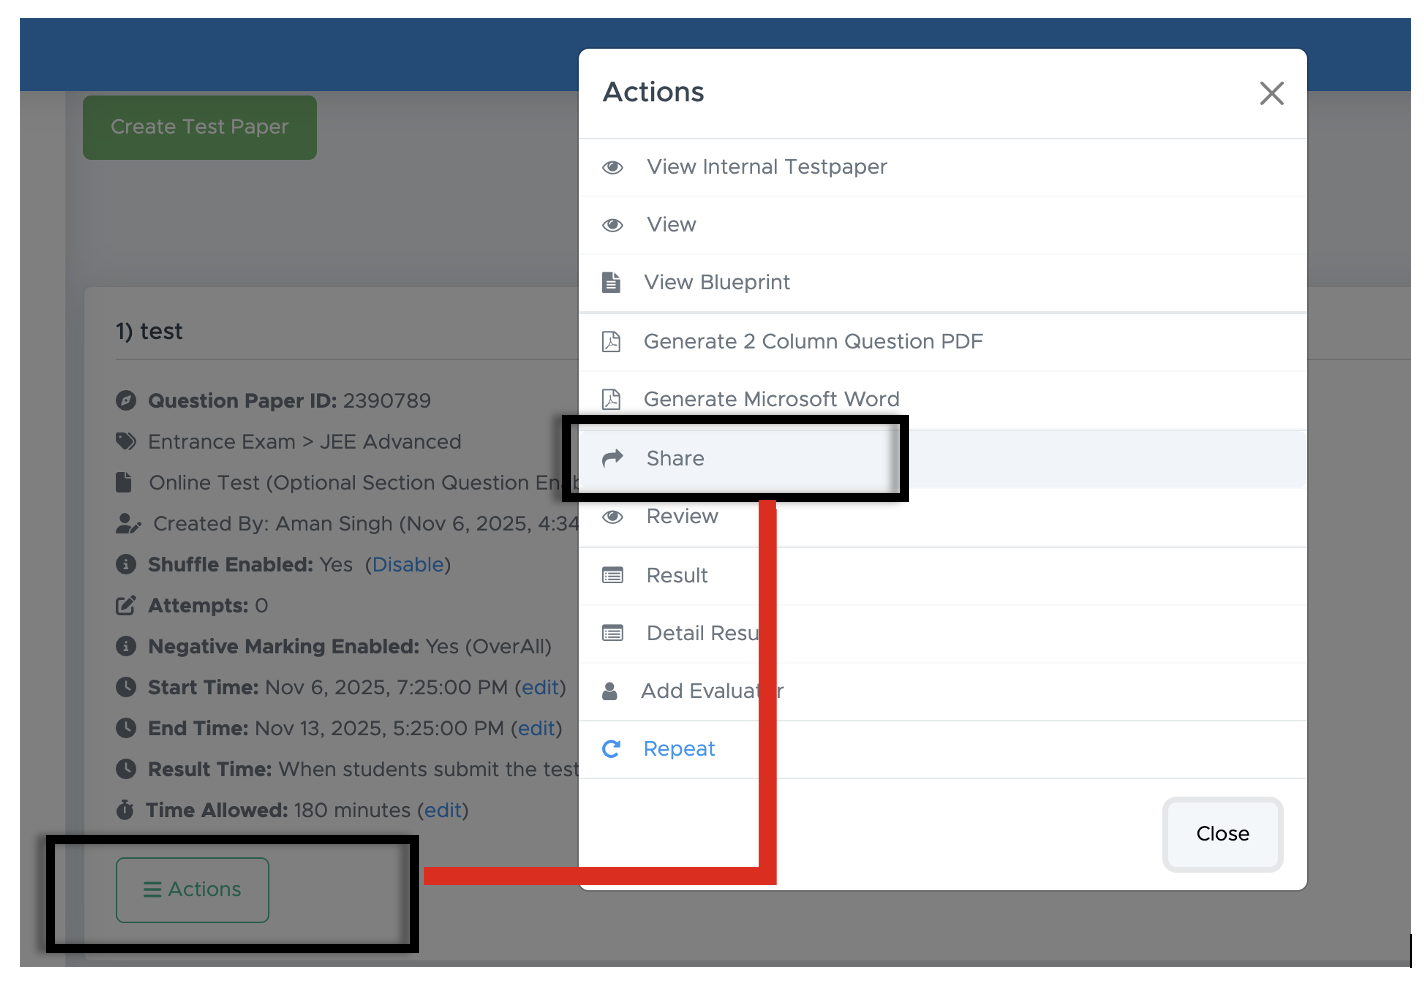
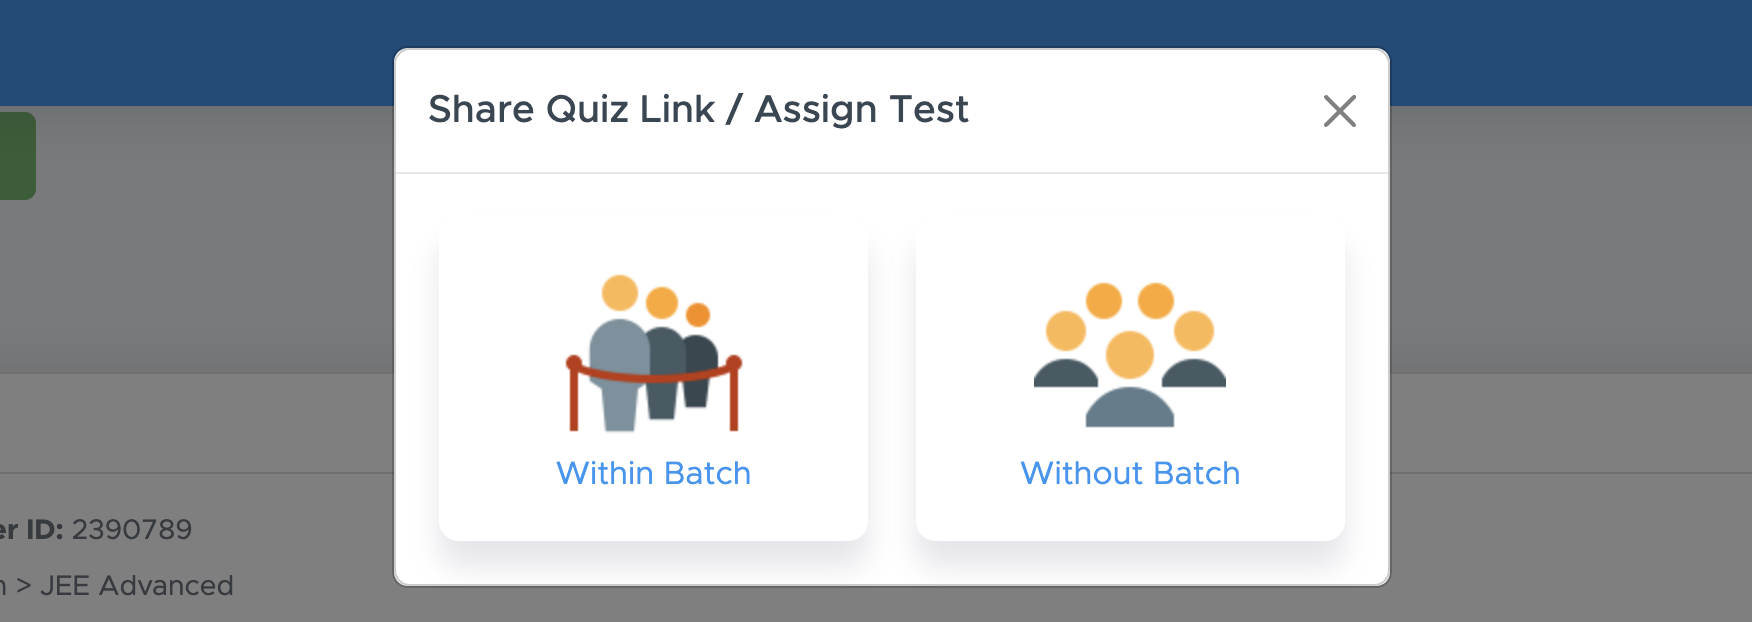
(B) Without Batch: If you want to share the quiz link with your students without any batch, simply select without batch option and then click Copy Link or click WhatsApp (if doing on a mobile phone), and share the same with your students via email, SMS or WhatsApp.
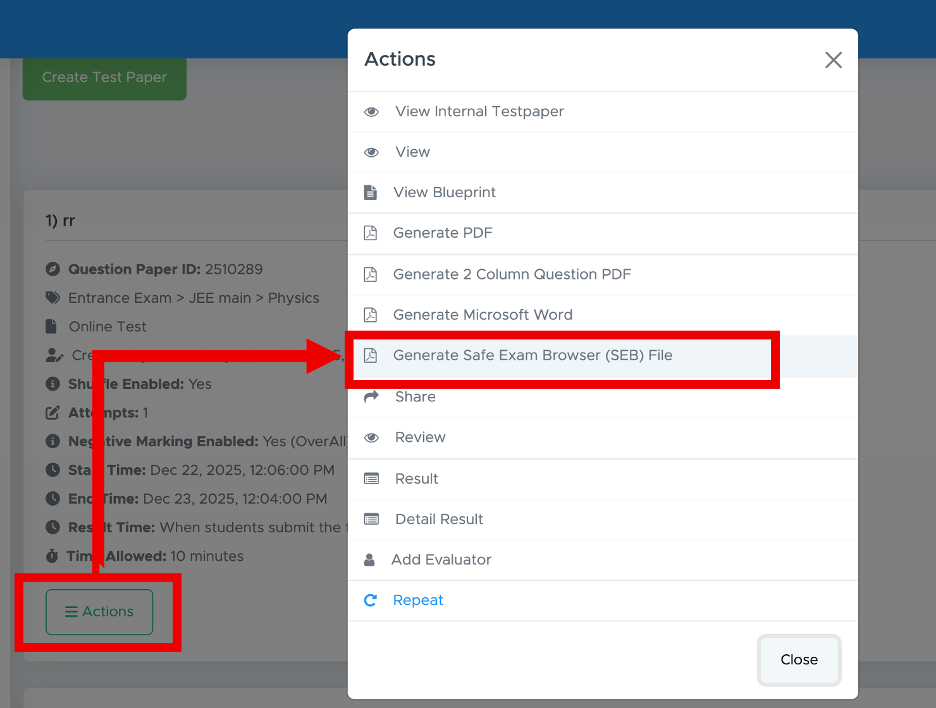
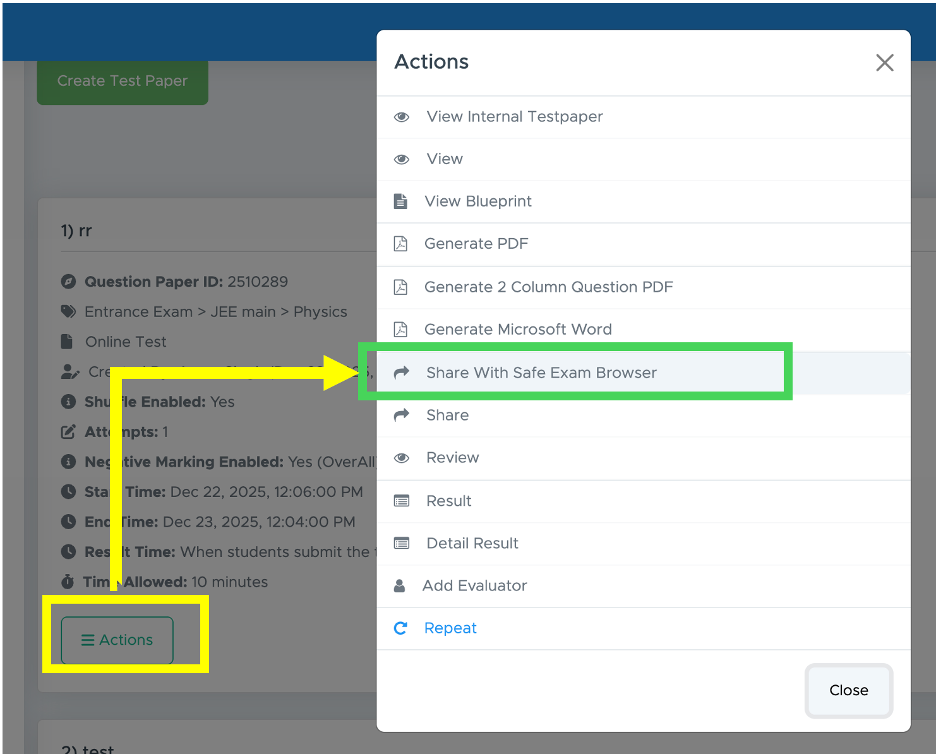
(b) Share on Safe Exam Browser
In short, Safe Exam Browser is very safe and secure as compared to a normal browser (Google Chrome, Safari, Firefox, etc)| Feature | Safe Exam Browser | Normal Browser |
|---|---|---|
| Prevents cheating | ✅ Yes | ❌ No |
| Blocks other apps | ✅ Yes | ❌ No |
| Re-attempt Blocked | ✅ Yes | ❌ No |
| Tab switching Blocked | ✅ Yes | ❌ No |
| Copy / Paste Disabled | ✅ Yes | ❌ No |

Step 10: Check Result and Download as PDF & CSV
Once the test is over, your students will get the result as per the settings implemented by you. However, you can get the result automatically by clicking on ACTIONS, then RESULT.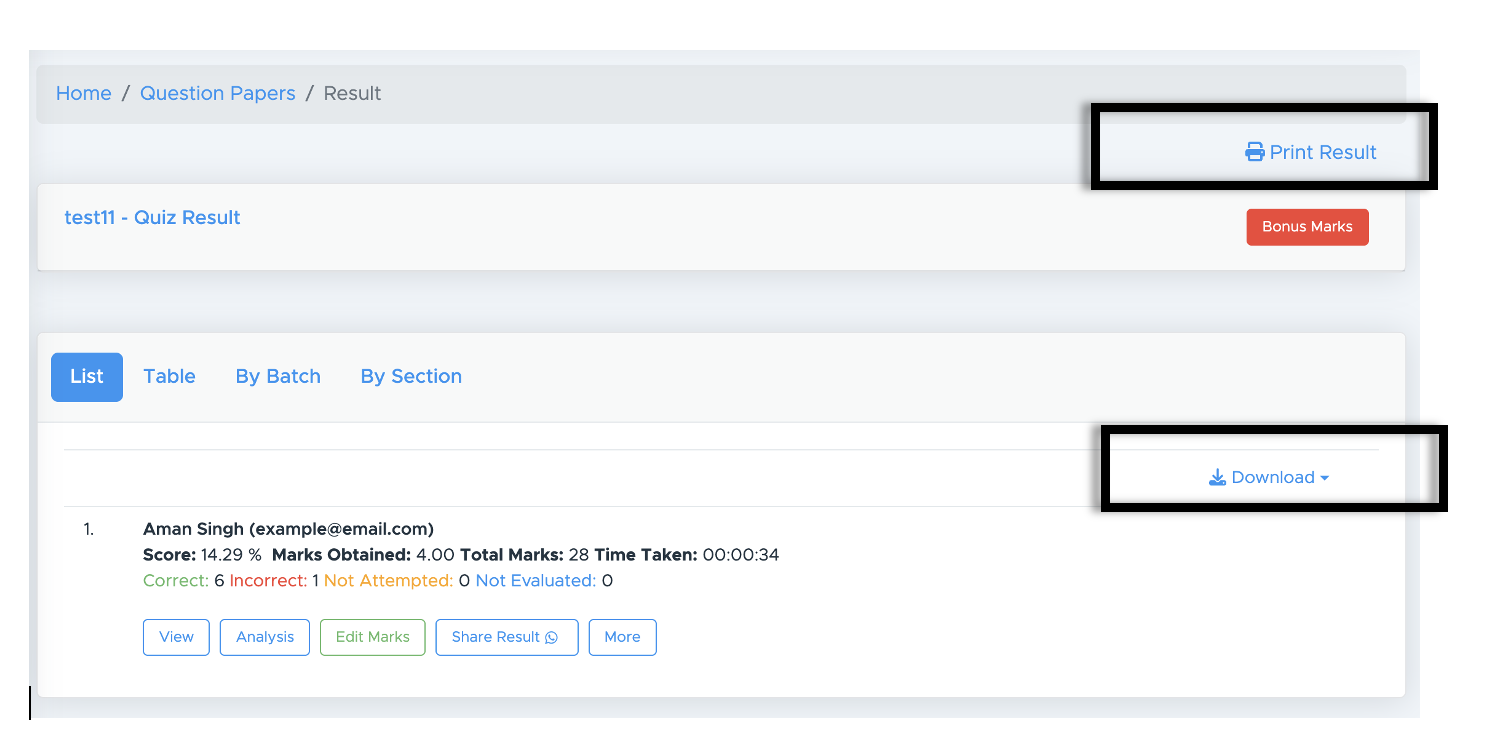
- Access the test results: After the test is taken, go to the result screen in the Test Generator.
- Initiate bonus marks: Find and click on the “Bonus Marks” option.
- Select questions: Choose the questions that were incorrect or had multiple correct answers.
- Enter marks: Input the number of bonus marks you want to award for each question.
- Process marks: Click on “Process Marks” to apply the bonus marks. Be cautious, as you cannot make changes after this step.
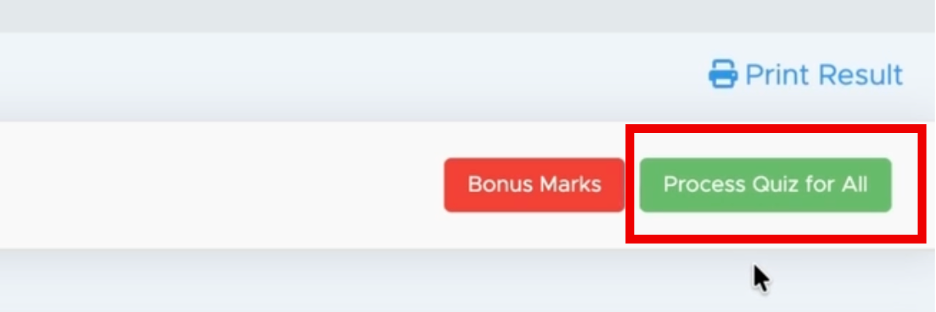
Modify Answer Key - Regenerate Result
After the test has been conducted and the results are declared, you may discover that a few options in the question paper were incorrect. In such cases, you can correct the affected question options and regenerate the results for all students using the updated answer key. Please note that result regeneration is a one-time process only. You may edit the answer key as many times as required before regeneration. However, once the results are regenerated, you will no longer be able to modify the answer key or regenerate the results. Important: Any change made using this feature applies only to the current test paper. It does not modify the original question or its correct answer in other test papers. What will NOT change:- Question Paper & Solution PDF
- Original Answer Key PDF & CSV
- Original Question Text & Options
- Result Analysis
- Report Card
- Result CSV file


Online test - Student Interface
Let’s take a look at how your students will attempt the online test and receive their results automatically. You can also share the tutorial below with your students to help them understand the entire process clearly and in detail.Online Test - Student Portal
Visit this tutorial to understand the Online Test student interface.